
How To Etch Glass:
The Finishing Touches
(Click on photo for larger view)
|
How To Etch Glass:The Finishing Touches(Click on photo for larger view) |
|
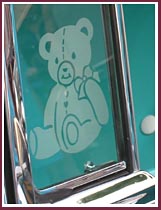
4: The Finishing Touches
The hard part is out of the way. Now, just a little clean-up, and you'll have a beautiful work of art! |
 |
After all the etching creme has been wiped away, thoroughly wash the glass with warm water and dish soap to remove any residue. You can take off the vinyl gloves now! |
Peel the stencil off the glass. It will come off in pieces, so be patient. You can use a utility knife to remove the small pieces. This can be a lengthy process, depending on the complexity of your design. The stencil is not reusable. |
 |
 |
Wash the glass thoroughly with window cleaner and paper towels. Admire your beautiful work! |
That's all there is to etching glass the Egress Etch way. Now, you can start planning your next Egress Etch project! |
![]() Previous Page
Previous Page ![]() How To Etch Glass
General Instructions
How To Etch Glass
General Instructions ![]()
![]() In Place, Vertical, and Large Project
Etching
In Place, Vertical, and Large Project
Etching ![]() Custom Designs
Custom Designs ![]()
![]() Custom Stencils for Glassware
Custom Stencils for Glassware ![]() What types of
glassware can I etch?
What types of
glassware can I etch? ![]()