
Instructions For In Place, Vertical, or Large Project Etching:
Applying Etching Cream
(Click on photo for larger view)

|
Instructions For In Place, Vertical, or Large Project Etching:Applying Etching Cream(Click on photo for larger view) |
|
REMEMBER -- ETCHING IS PERMANENT! |
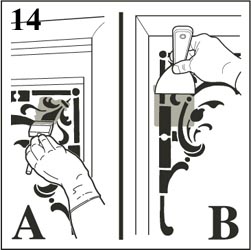 |
Step 14:There are two ways to apply the cream and both work well. Use method A or B…whichever works best for you. This step is a bit messy and may take some time depending on the size of the etching.(A) Thickly dab the etching cream on the exposed glass with a large foam brush but DO NOT use a brushing motion against the glass as you would if you were applying paint. Doing so will leave lines and marks in your final etching. You will want to "float" a thick layer of the cream on to the glass.(B) You can also apply the etching cream by floating a thick layer over the stencil using a squeegee or plastic putty knife.Once all the cream is applied, use the putty knife or squeegee to float an even layer of the cream over the entire piece. |
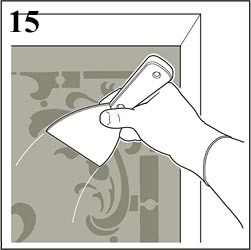
Step 15:As you wait fifteen minutes for the etching cream to do its job, continue to float the etching cream across the window several times. Using the squeegee or plastic putty knife, work the cream carefully from top to bottom and side to side, leaving a thick layer of cream. Overlap your strokes so you don't miss any portion of the glass. Pay special attention to corners and around all the elements of the design. Do not worry that the areas of the glass that received the etching cream in the first part application will be more deeply etched. The etching cream has a "memory" and will only etch the glass to a certain point. The etching cream will not "eat" the glass. |
 |
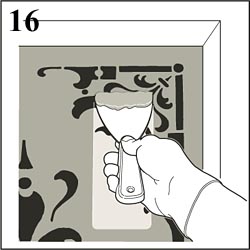 |
Step 16:When the fifteen-minute etching period is complete, carefully scrap off the etching cream with a plastic putty knife or squeegee. Be careful not to damage the stencil. Save as much of the etching cream as you can. It is reusable. Get a bucket of warm water and rags or paper towels and wipe off all the remaining etching cream.After all the etching cream has been removed, thoroughly wash the glass with clean warm water and dish soap. Then do another cleaning using window spray and paper towels or a clean cotton dishtowel. Make sure all the etching chemical has been removed before you continue. |
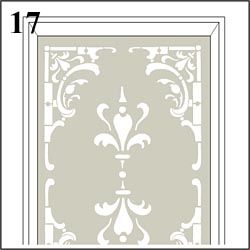
Step 17:Peel the stencil off the glass. Use a single edged razor blade or utility knife to remove small pieces. This step can take time depending on the complexity of your design. The stencil will come off in pieces and is not reusable. Wash the glass thoroughly with paper towels and window cleaner one last time and enjoy your new work of art! |
 |
![]() Back to In Place,
Vertical, and Large Project Etching
Back to In Place,
Vertical, and Large Project Etching ![]()
![]() In Place, Vertical, and Large Project
Etching
In Place, Vertical, and Large Project
Etching ![]() Custom Designs
Custom Designs ![]()
![]() Custom Stencils for Glassware
Custom Stencils for Glassware ![]() Glass Etching
Supplies
Glass Etching
Supplies ![]()
![]() What is "Weeding?"
What is "Weeding?" ![]() What types of
glassware can I etch?
What types of
glassware can I etch? ![]() How To Etch Glass: General
Instructions
How To Etch Glass: General
Instructions ![]()