Instructions For In Place, Vertical, or Large Project Etching:
Dry Mount Stencil Application
(Click on photo for larger view)
|
Instructions For In Place, Vertical, or Large Project Etching:Dry Mount Stencil Application(Click on photo for larger view) |
|
TIP: The adhesive for the stencils is specifically designed to hold tight to the glass during the etching process. Be very careful to align and place the stencil properly the first time. You cannot remove the stencil and reposition it once it is stuck to the glass! Please remember: Due to the necessity of a very tight seal between stencil and glass surface, Egress Etch stencils are are SINGLE USE only. |
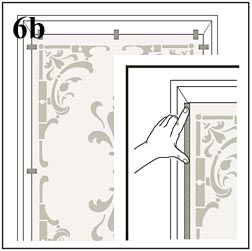 |
Step 6b:Before removing the backing paper or transfer tape, position the stencil in place exactly where you want it and tape it into place with small pieces of masking tape. Make any adjustments to positioning,then tape across the entire top OR side of the stencil. This long piece of tape will act as a "hinge." Remove the small pieces of tape used for positioning. |
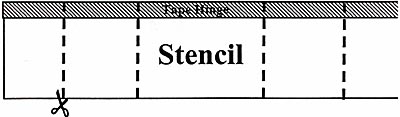
TIP: For very large stencils, you may cut the stencil into sections for easier placement. Cut the stencil AFTER you have taped it into place and have your "hinge" exactly where you want it. Cut the stencil into pieces from the "free edge" up to the tape hinge.
Working in smaller pieces is more manageable...but make sure NOT to cut through elements of the design. The tape hinge will help everyting to "fall into place" as you proceed. |
Step 7b:Flip the stencil away from the glass using the taped edge as a "hinge." |
 |
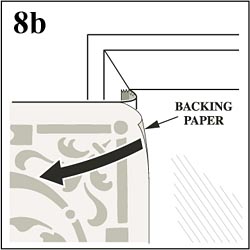 |
Step 8b:Carefully remove the backing paper starting at the hinged edge. Work the stencil onto the glass as you go. With very large stencils, it is helpful to have two people to do this step. |
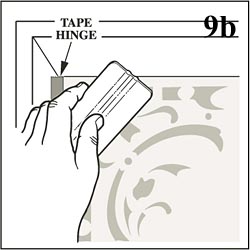
Step 9b:Burnish the stencil to the glass once again, then remove the pieces of tape hinge. |
 |
You are ready to continue on to the next step in creating your masterpiece! |
![]() In Place, Vertical, and Large Project
Etching
In Place, Vertical, and Large Project
Etching ![]() Custom Designs
Custom Designs ![]()
![]() Custom Stencils for Glassware
Custom Stencils for Glassware ![]() Glass Etching
Supplies
Glass Etching
Supplies ![]()
![]() What is "Weeding?"
What is "Weeding?" ![]() What types of
glassware can I etch?
What types of
glassware can I etch? ![]() How To Etch Glass: General
Instructions
How To Etch Glass: General
Instructions ![]()